推荐博文:
- https://mp.weixin.qq.com/s/J4ghw2iWQTKoNynF3gIcPQ
- https://www.shangyang.me/2016/12/16/hexo-base-concept/
- https://segmentfault.com/a/1190000021614307
- https://juejin.cn/post/6844903805859921933

搭建过程
hexo 是一个快速、简洁且高效的博客框架。
Hexo安装
brew install git node  # 安装git 和node
npm config set registry https://registry.npm.taobao.org # 配置npm源
npm install -g hexo-cli  # 安装hexo
proxychains4 hexo  init Mr-Framework   # 初始化博客
git clone https://github.com/yelog/hexo-theme-3-hexo.git themes/3-hexo   # 下载3-hexo主题
Hexo目录结构
Mr-Framework
├── _config.yml        // 网站配置文件
├── node_modules    // npm依赖模块目录
├── package-lock.json    // node项目配置文件
├── package.json    // node项目配置文件
├── scaffolds            // 新建mardown文件模板目录
│   ├── draft.md
│   ├── page.md
│   └── post.md
├── source        // 存放makrdown文件和图片
│   └── _posts
│       └── hello-world.md  //hexo默认markdown文件
└── themes                                //hexo主题目录
    └── 3-hexo
    ├── LICENSE
    ├── README.md
    ├── _config.yml                //主题配置文件
    ├── languages                    //语言支持插件
    │   ├── en.yml
    │   └── zh-CN.yml
    ├── layout                        //布局文件
    │   ├── _partial
    │   ├── index.ejs
    │   ├── indexs.md
    │   └── post.ejs
    └── source                    //主题源代码
        ├── css
        ├── img
        └── js
Hexo配置文件
# Hexo Configuration
## Docs: https://hexo.io/docs/configuration.html
## Source: https://github.com/hexojs/hexo/

# Site
title: Mr.Framework   #网站标题
subtitle: 'subtitle'   #网站副标题
description: ''      #网站描述,主要用于SEO,告诉搜索引擎一个关于您站点的简单描述,通常建议在其中包含您网站的关键词
keywords:       #网站的关键词,支持多个
author: askDing    #作者
language: en       #网站使用的语言
timezone: 'Asia/Shanghai'      #时区,

# URL
## If your site is put in a subdirectory, set url as 'http://example.com/child' and root as '/child/'
url: https://askding.github.io
root: /     # 网站根目录存放位置
permalink: :category/:title.html   # 文章中的永久链接格式
permalink_defaults:   # 永久链接中的默认设置
pretty_urls:
  trailing_index: true # Set to false to remove trailing 'index.html' from permalinks
  trailing_html: true # Set to false to remove trailing '.html' from permalinks

# Directory
source_dir: source   # 资源文件夹,存放内容的
public_dir: public    # 公共文件夹,用于存放生成的站点文件
tag_dir: tags        # 标签文件夹
archive_dir: archives    # 归档文件夹
category_dir: categories  # 分类文件夹
code_dir: downloads/code  # source_dir下的子目录,存放代码用的
i18n_dir: :lang      # 国际化文件夹
skip_render:       # 跳过指定文件的渲染,匹配到文件将直接复制到public目录中

# Writing
new_post_name: :year-:month-:day-:title.md # File name of new posts
default_layout: page
titlecase: false # Transform title into titlecase
external_link:
  enable: true # Open external links in new tab
  field: site # Apply to the whole site
  exclude: ''
filename_case: 0
render_drafts: false
post_asset_folder: false
relative_link: false
future: true
highlight:
  enable: false
  line_number: true
  auto_detect: false
  tab_replace: ''
  wrap: true
  hljs: false
prismjs:
  enable: false
  preprocess: true
  line_number: true
  tab_replace: ''

# Home page setting
# path: Root path for your blogs index page. (default = '')
# per_page: Posts displayed per page. (0 = disable pagination)
# order_by: Posts order. (Order by date descending by default)
index_generator:
  path: ''
  per_page: 10
  order_by: -date

# Category & Tag
default_category: askDing
category_map:
tag_map:

search:      # 文章搜索
   path: search.xml
   field: _post

# Metadata elements
## https://developer.mozilla.org/en-US/docs/Web/HTML/Element/meta
meta_generator: true

# Date / Time format
## Hexo uses Moment.js to parse and display date
## You can customize the date format as defined in
## http://momentjs.com/docs/#/displaying/format/
date_format: YYYY-MM-DD
time_format: HH:mm:ss
## updated_option supports 'mtime', 'date', 'empty'
updated_option: 'date'

# Pagination
## Set per_page to 0 to disable pagination
per_page: 10
pagination_dir: page

# Include / Exclude file(s)
## include:/exclude: options only apply to the 'source/' folder
include:
exclude:
ignore:

# Extensions
## Plugins: https://hexo.io/plugins/
## Themes: https://hexo.io/themes/
theme: 3-hexo

## Plugins: http://hexo.io/plugins/
#RSS订阅和sitemap
plugin:
  - hexo-generator-feed
  - hexo-generator-feed
  - hexo-generator-sitemap
#Feed Atom
feed:
type: atom
path: atom.xml
limit: 20

# Deployment
## Docs: https://hexo.io/docs/one-command-deployment
deploy:
  type: 'git'
  repository: https://github.com/askDing/askDing.github.io.git
  branch: master
主题配置
hexo的主题仓库点击此处
推荐的博客主题 **3-hexo**、Arknights 、 freemind.bithack
Mr-Framework/themes/3-hexo/_config.yml
基础配置
UI颜色配置
Mr-Framework/themes/3-hexo/source/css/_partial/nav-right.styl
.nav-right
  width 420px
  height 100%
  background #F2F1D7    /* 柔黄色 */
  border-right 1px solid #e5e8ec
  overflow hidden
  float left
  position relative
  -webkit-user-select none
  -moz-user-select none
  -ms-user-select none
  -o-user-select none
  user-select none
Mr-Framework/themes/3-hexo/source/css/_partial/post.styl
#post
  height 100%
  font-weight: 350;
  font-size: 14px;
  line-height 1.55
  background #E8FFE8    /* 浅绿色  */
  overflow-x hidden
  overflow-y auto
  -webkit-overflow-scrolling touch
  font-family -apple-system,system-ui,BlinkMacSystemFont,Helvetica Neue,PingFang SC,Hiragino Sans GB,Microsoft YaHei,Arial,sans-serif
  color #2f2f2f
  margin-left 1px


   article
      padding 1em    /* 内容间隔1em */
      background #E8FFE8
      .article-entry>p:nth-child(1)
        margin-top 20px

   .copyright
    margin-top 50px
    padding-bottom 30px
    background #E8FFE8    /* 版权浅绿色 */
    line-height 14px
    text-align center
    color #BCC1C4
Gitalk评论背景颜色
/Mr-Framework/themes/3-hexo/source/css/_partial/comment.styl
#comments
  padding 2.5em
  background #e8ffe8   /* 评论区背景颜色   */
  .comment-bar
    display block
    cursor pointer
    background rgba(255,255,255,0.3)
    padding 0.5rem
    -webkit-box-shadow 3px 2px 8px rgba(0,0,0,0.07)
    box-shadow 3px 2px 8px rgba(0,0,0,0.07)
    text-align center
    font-size 2rem
头像配置
图片存放在 Mr-Framework/themes/3-hexo/source/img/
avatar: /img/avatar.png
favicon: /img/avatar.png
联系链接配置
ink:
  theme: color # 链接样式,color: 彩色图标  white: 黑白图标
  items:
    rss: /atom.xml
    github: https://github.com/askDing
    email: askding@qq.com
    qq: 741474596
文章分类设置
category:
  num: true # 分类显示文章数
  sub: true # 开启多级分类
  sort:
    - Cyber Security
    - aaa
    - bb
左下角自定义菜单
menu:
  about:  # '关于' 按钮
    on: true # 是否显示
    url: /about  # 跳转链接
    type: 1 # 跳转类型 1:站内异步跳转 2:当前页面跳转 3:打开新的tab页
  friend: # '友链' 按钮
    on: true # 是否展示
  menus: # 添加的其他菜单写在 menus 下,如下三个菜单:动态菜单1、动态菜单2、动态菜单3
    相册:
      on: false
      url: /photo
      type: 1  # 跳转类型 1:站内异步跳转
    叶落阁:
      on: false
      url: http://yelog.org/
      type: 2  # 跳转类型 2:当前页面跳转
    github:
      on: false
      url: https://github.com/yelog
      type: 3  # 跳转类型 3:打开新的tab页
文末声明
# 文末声明
article_txt: 转载请注明来源,欢迎对文章中的引用来源进行考证,欢迎指出任何有错误或不够清晰的表达。可以在下面评论区评论,也可以邮件至 askding@qq.com

bottom_text: ©1996-2020 Mr.Framework
# 自定义页面最下方的站点版权信息
# 如果不填,则自定义为 ©2017 author (这个author为hexo根目录_config.yml中配置的)

# 底部备案号
miit:
  on: false
  info: 京ICP证030173号
  url: http://beian.miit.gov.cn/ # 默认链接为 http://beian.miit.gov.cn/
左侧导航宽度
Mr-Framework/themes/3-hexo/source/css/_partial/nav-left.styl
.nav-left
  width 130px    /* 左侧导航宽度 130px */
  height 100%
  background #2A2935
  box-shadow inset -15px 0 15px -15px #222
  float left
  position relative
  -webkit-user-select none
  -moz-user-select none
  -ms-user-select none
  -o-user-select none
  user-select none
不蒜子网站计数配置
# 不蒜子网站计数设置
# http://ibruce.info/2015/04/04/busuanzi/
visit_counter:
  on: true
  site_visit: true
  page_visit: true
代码高亮配置
- 禁用网站配置文件里的代码高亮设置
Mr-Framework/_config.yml
highlight: enable: false /* 禁用代码高亮 */ line_number: true auto_detect: false tab_replace: '' wrap: true hljs: false - 启用主题配置文件里的代码高亮
Mr-Framework/themes/3-hexo/_config.yml
highlight:
on: true # true开启代码高亮,开启需要关闭博客 _config.yml 中的 highlight
lineNum: false # true显示行号
copy: true # 复制功能
theme: gruvbox-dark
高级配置
MathJax数学公式
修改 _config.yml
# MathJax 数学公式支持
mathjax:
  on: true #是否启用
  per_page: false # 若只渲染单个页面,此选项设为false,页面内加入 mathjax: true
yaml复制代码
考虑到页面的加载速度,支持渲染单个页面。
设置 per_page: false ,在需要渲染的页面内 加入 mathjax: true
注意:
由于hexo的MarkDown渲染器与MathJax有冲突,可能会造成矩阵等使用不正常。所以在使用之前需要修改两个地方
编辑node_modules\marked\lib\marked.js脚本
- 将451行 ,这一步取消了对
\\,\{,\}的转义(escape)
escape: /^\\([\\`*{}\[\]()# +\-.!_>])/,
改为
escape: /^\\([`*\[\]()# +\-.!_>])/,- 将459行,这一步取消了对斜体标记
_的转义
em: /^\b_((?:[^_]|__)+?)_\b|^\*((?:\*\*|[\s\S])+?)\*(?!\*)/,
改为
em:/^\*((?:\*\*|[\s\S])+?)\*(?!\*)/,
添加Mermaid图标
##>>>>>>>在网站配置文件中Mr-Framework/_config.yml添加如下内容 <<<<<<<<<<<<###

# Mermaid 支持
mermaid:
  on: true
  cdn: //cdn.jsdelivr.net/npm/mermaid@8.4.2/dist/mermaid.min.js
  #cdn: //cdnjs.cloudflare.com/ajax/libs/mermaid/8.3.1/mermaid.min.js
  options: # 更多配置信息可以参考 https://mermaidjs.github.io/#/mermaidAPI
    theme: 'default'
    startOnLoad: true
    flowchart: true
      useMaxWidth: false
      htmlLabels: true

##>>>>>>>命令行安装hexo-filter-mermaid-diagrams插件 <<<<<<<<<<<<###
npm install hexo-filter-mermaid-diagrams
字数统计
word_count: false
# true 开启字数统计
# 开启此功能需要安装插件 :在 hexo根目录 执行
npm install hexo-wordcount
配置思维导图
npm install hexo-simple-mindmap  # 安装思维导图插件

在markdown中按照如下格式输写

{% pullquote mindmap mindmap-md %}
- [在 Hexo 中使用思维导图](https://hunterx.xyz/use-mindmap-in-hexo.html)
  - 前言
  - 操作指南
    - 准备需要的文件
    - 为主题添加 CSS/JS 文件
  - 使用方法
{% endpullquote %}
全文搜索
searchAll: ture
# true 启用全文搜索
# 开启此功能需要下面操作:
# 1. 在 hexo 根目录 执行 npm install hexo-generator-search --save 安装插件
# 2. 在 hexo 根目录的 _config.xml 中添加下面内容
# search:
#   path: search.xml
#   field: post
npm install hexo-generator-search
添加RSS和Sitemap
##>>>>>>>在网站配置文件中Mr-Framework/_config.yml添加如下内容 <<<<<<<<<<<<###
## Plugins: http://hexo.io/plugins/
#RSS订阅和sitemap
plugin:
- hexo-generator-feed
- hexo-generator-sitemap
#Feed Atom
feed:
type: atom
path: atom.xml
limit: 20
##### 在主题配置文件中Mr-Framework/themes/3-hexo/_config.yml添加如下内容 <<<<<<<######
link:
theme: color # 链接样式,color: 彩色图标 white: 黑白图标
items:
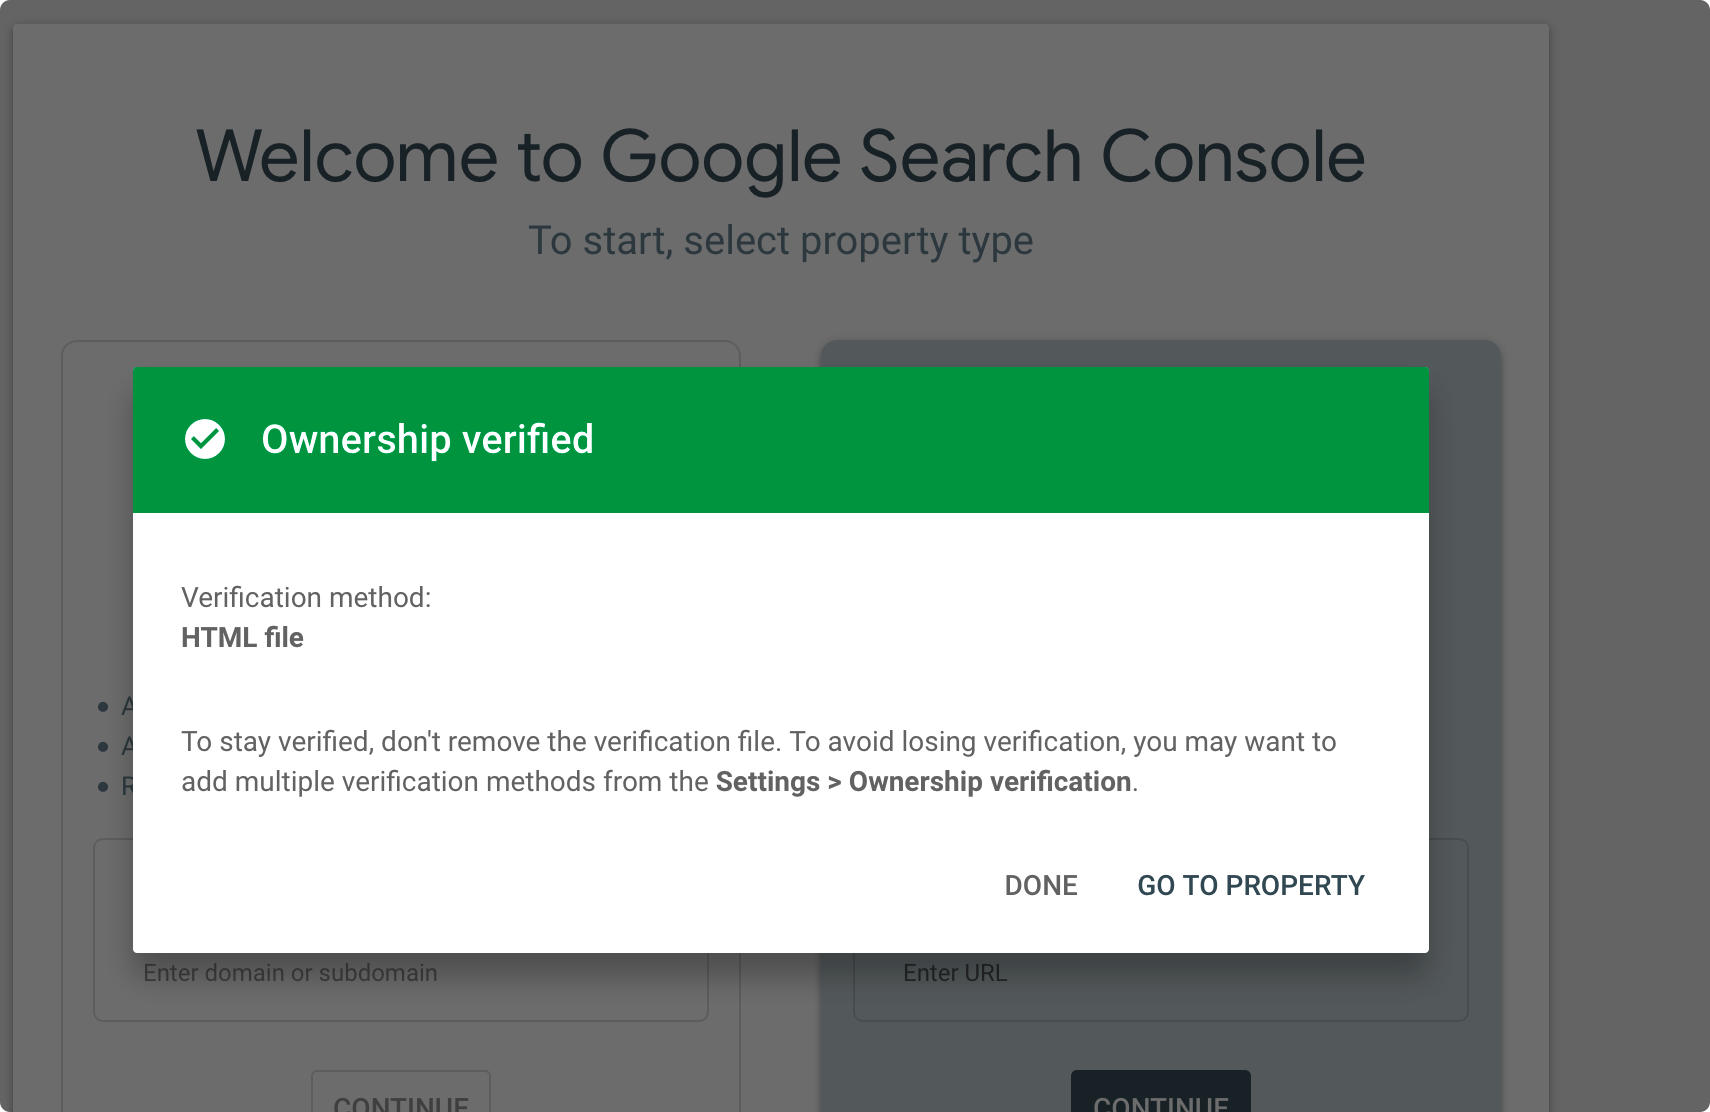
rss: /atom.xmlnpm install hexo-generator-feed hexo-generator-sitemap 提交sitemap到Google站点平台
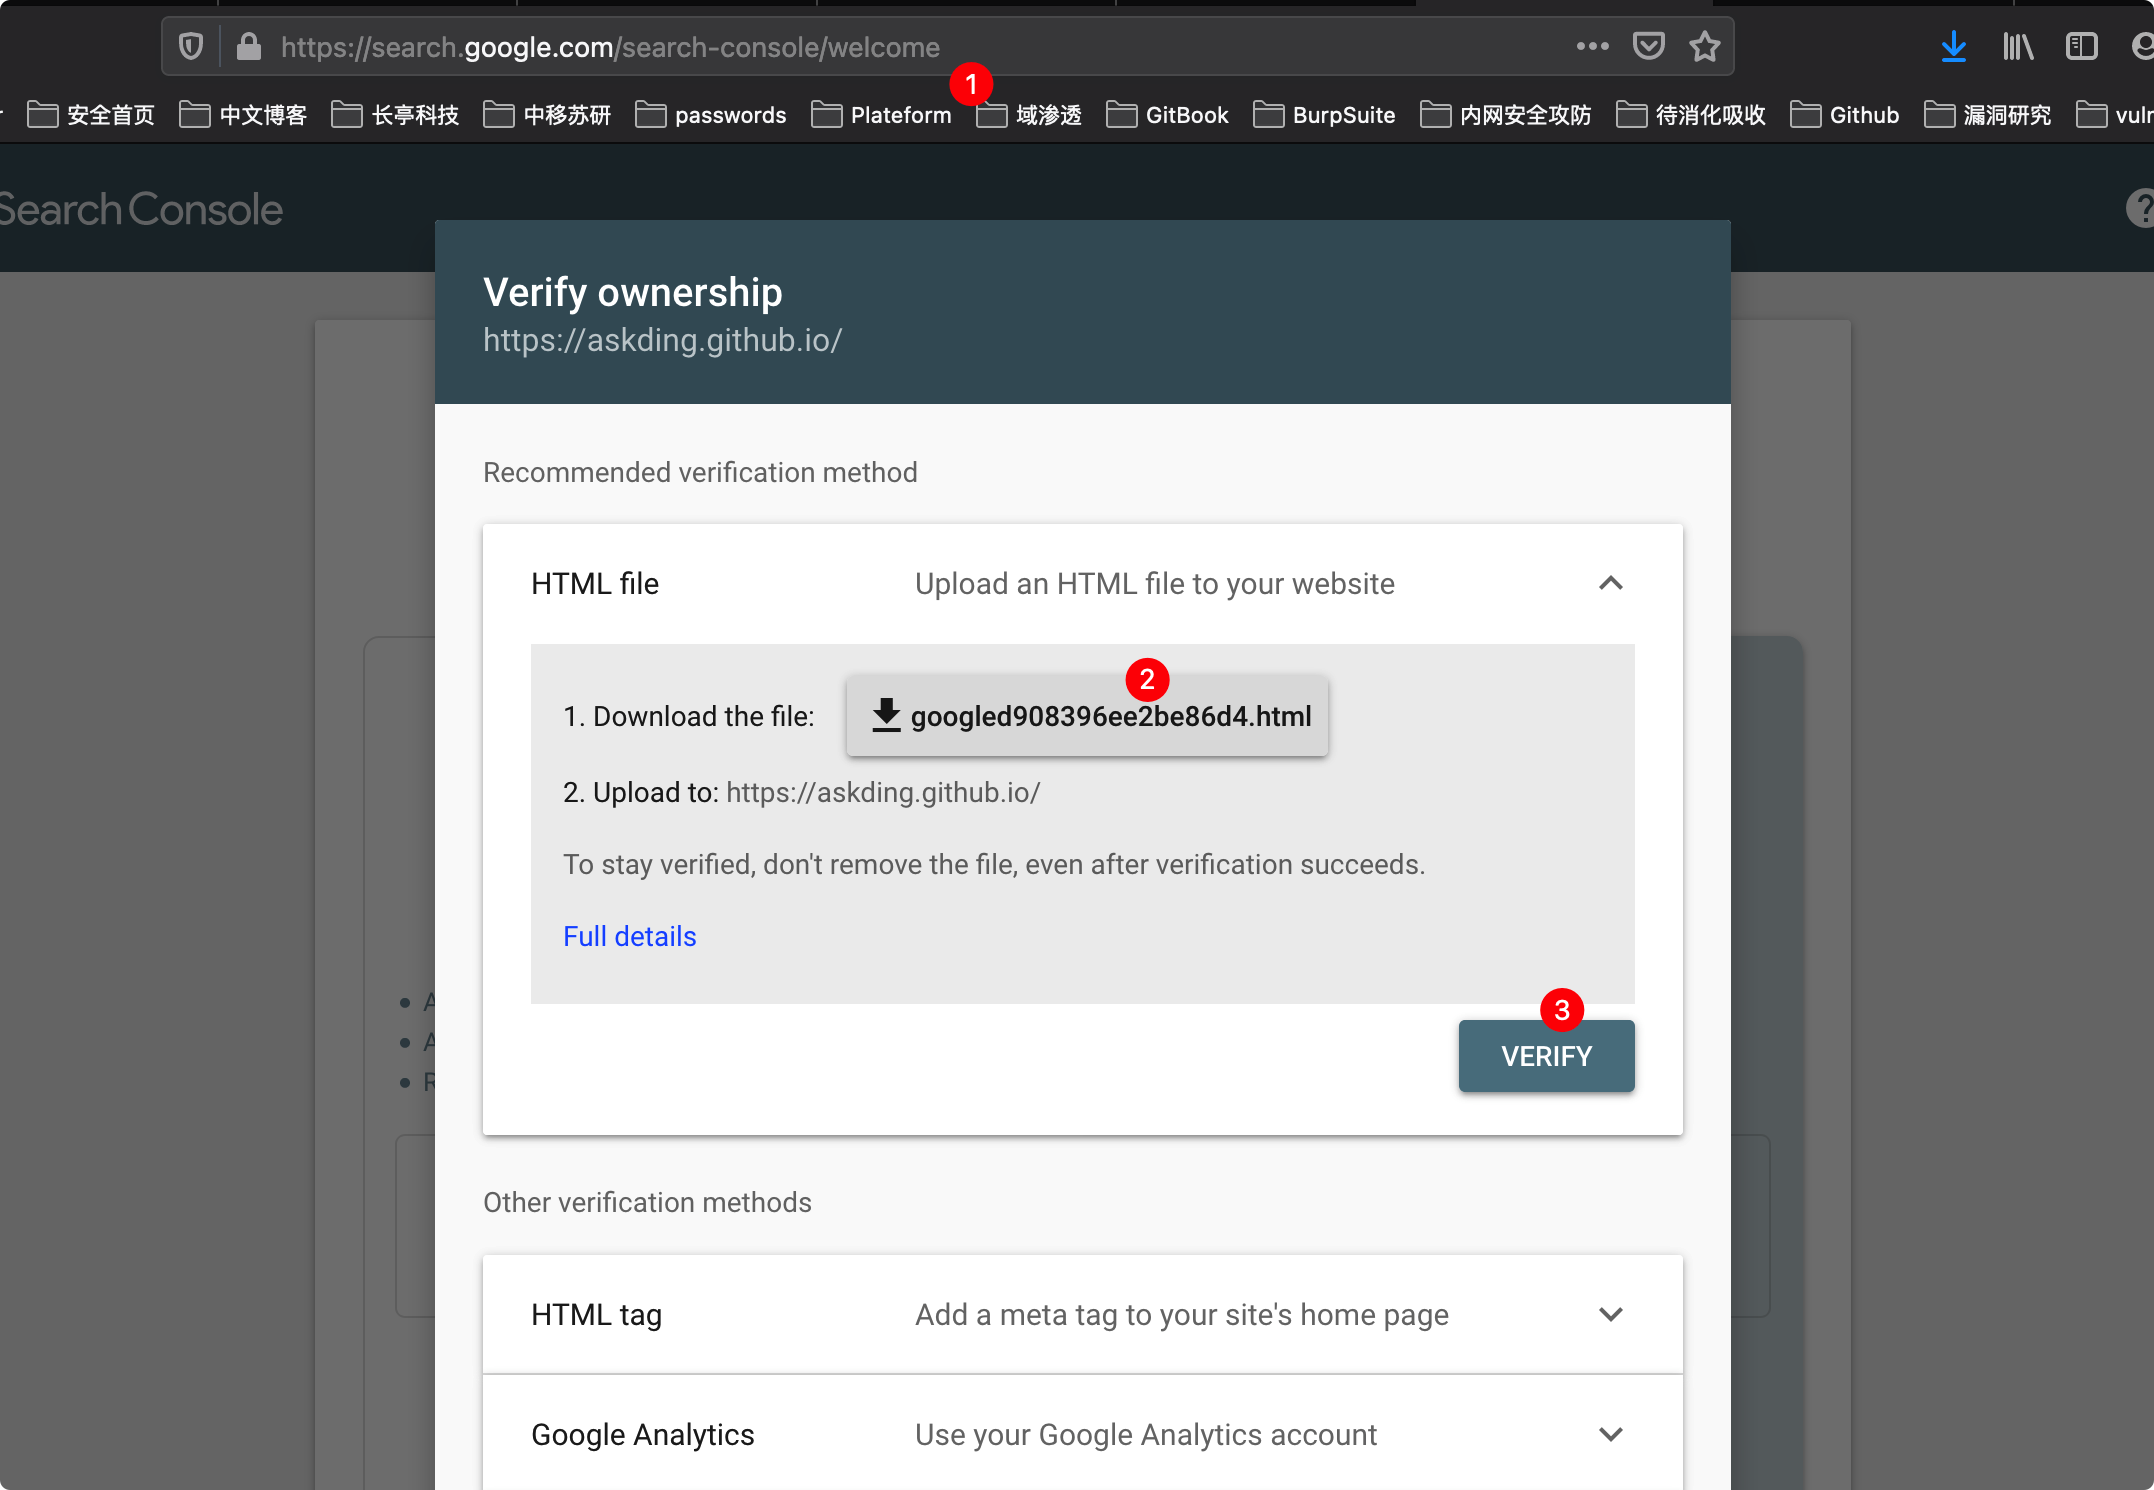
下载这个html文件,到网站仓库上传这个html文件点击VERIFY
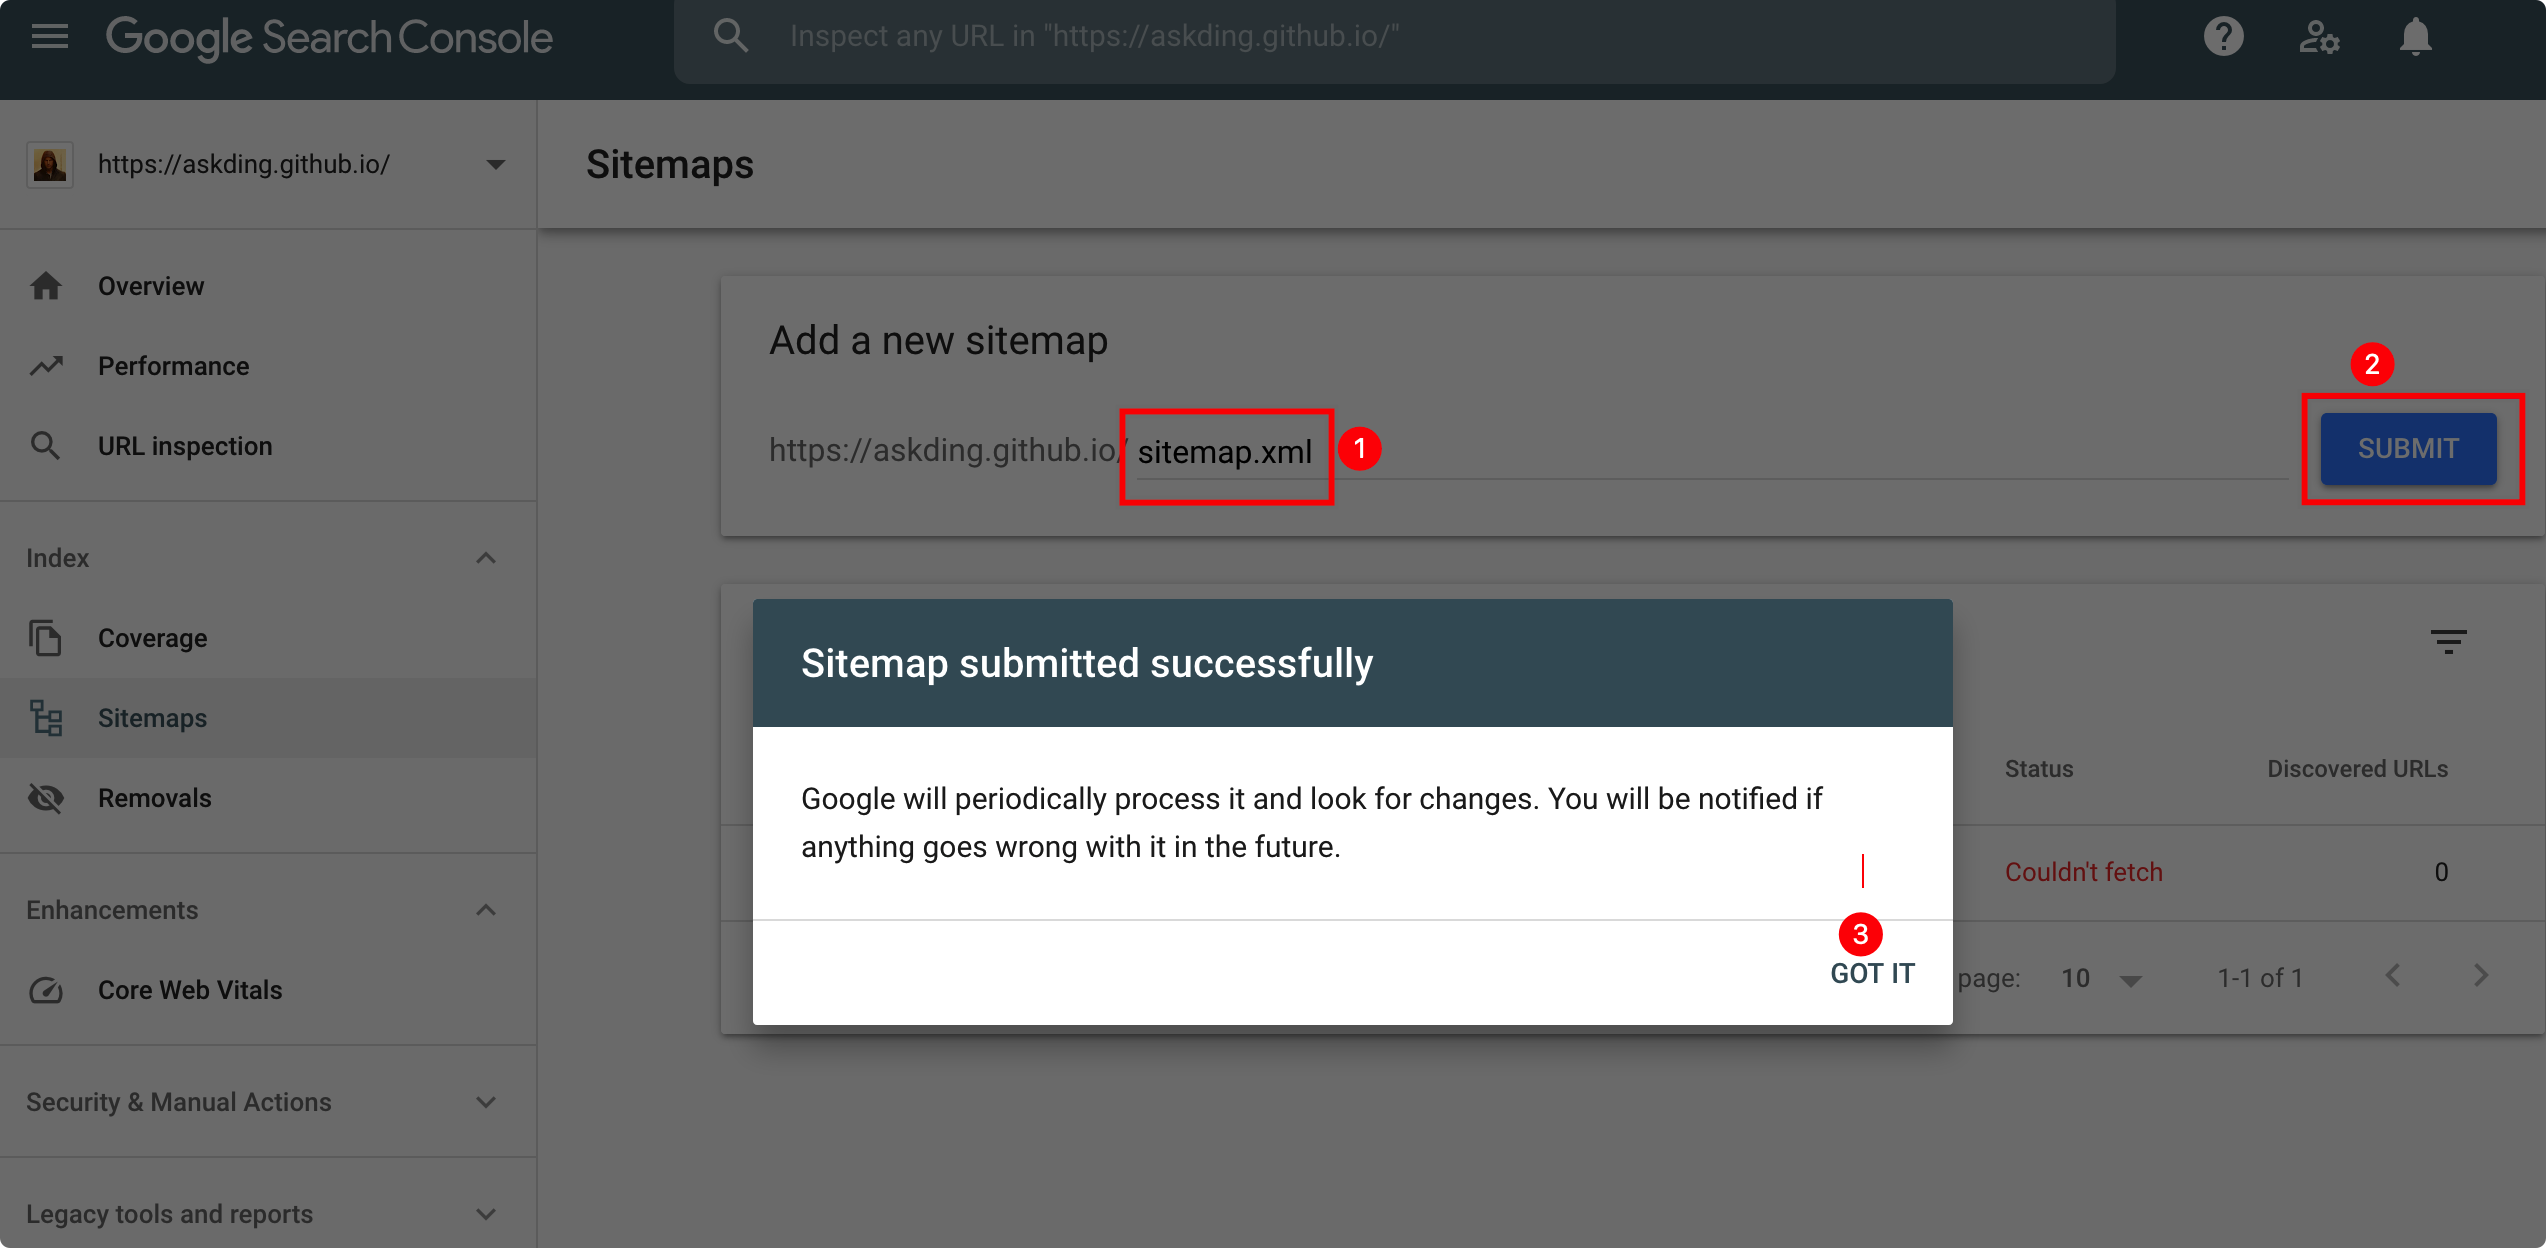
添加站点文件sitemap.xml
添加建站时间
<!-- 添加建站时间代码到Mr-Framework/themes/3-hexo/layout/_partial/footer.ejs文件末尾 -->
<script language=javascript>
    function siteTime() {
        window.setTimeout("siteTime()", 1000);
        var seconds = 1000;
        var minutes = seconds * 60;
        var hours = minutes * 60;
        var days = hours * 24;
        var years = days * 365;
        var today = new Date();
        var todayYear = today.getFullYear();
        var todayMonth = today.getMonth() + 1;
        var todayDate = today.getDate();
        var todayHour = today.getHours();
        var todayMinute = today.getMinutes();
        var todaySecond = today.getSeconds();
        /* Date.UTC() -- 返回date对象距世界标准时间(UTC)1970年1月1日午夜之间的毫秒数(时间戳)
        year - 作为date对象的年份,为4位年份值
        month - 0-11之间的整数,做为date对象的月份
        day - 1-31之间的整数,做为date对象的天数
        hours - 0(午夜24点)-23之间的整数,做为date对象的小时数
        minutes - 0-59之间的整数,做为date对象的分钟数
        seconds - 0-59之间的整数,做为date对象的秒数
        microseconds - 0-999之间的整数,做为date对象的毫秒数 */
        var t1 = Date.UTC(2020, 12, 05, 00, 00, 00); //北京时间2020-12-05 00:00:00
        var t2 = Date.UTC(todayYear, todayMonth, todayDate, todayHour, todayMinute, todaySecond);
        var diff = t2 - t1;
        var diffYears = Math.floor(diff / years);
        var diffDays = Math.floor((diff / days) - diffYears * 365);
        var diffHours = Math.floor((diff - (diffYears * 365 + diffDays) * days) / hours);
        var diffMinutes = Math.floor((diff - (diffYears * 365 + diffDays) * days - diffHours * hours) / minutes);
        var diffSeconds = Math.floor((diff - (diffYears * 365 + diffDays) * days - diffHours * hours - diffMinutes * minutes) / seconds);
        document.getElementById("sitetime").innerHTML = "本站已运行 " +diffYears+" 年 "+diffDays + " 天 " + diffHours + " 小时 " + diffMinutes + " 分钟 " + diffSeconds + " 秒";
    }/*因为建站时间还没有一年,就将之注释掉了。需要的可以取消*/
    siteTime();
</script>
然后在合适的地方(比如copyright声明后面)加上下面的代码就行了:
Mr-Framework/themes/3-hexo/layout/indexs.md文件中添加如下代码
<span id="sitetime"></span>添加百度统计和谷歌统计代码-不适用
打开themes/matery/layout/_partial/head.ejs,修改下面两行:
<meta name="baidu-site-verification" content="fmlEuI34ir" />
<meta name="google-site-verification" content="yCy2azpds5XSuGZvis6OuA-XIGF5GuGpYRAaGfD6o48" />其中content内容改成你自己的就行了。
图片添加水印-未适用
为了防止别人抄袭你文章,可以把所有的图片都加上水印,方法很简单。
首先在博客根目录下新建一个watermark.py,代码如下:
# -*- coding: utf-8 -*-
import sys
import glob
from PIL import Image
from PIL import ImageDraw
from PIL import ImageFont


def watermark(post_name):
    if post_name == 'all':
        post_name = '*'
    dir_name = 'source/_posts/' + post_name + '/*'
    for files in glob.glob(dir_name):
        im = Image.open(files)
        if len(im.getbands()) < 3:
            im = im.convert('RGB')
            print(files)
        font = ImageFont.truetype('STSONG.TTF', max(30, int(im.size[1] / 20)))
        draw = ImageDraw.Draw(im)
        draw.text((im.size[0] / 2, im.size[1] / 2),
                  u'@yourname', fill=(0, 0, 0), font=font)
        im.save(files)


if __name__ == '__main__':
    if len(sys.argv) == 2:
        watermark(sys.argv[1])
    else:
print('[usage] <input>')字体也放根目录下,自己找字体。然后每次写完一篇文章可以运行python3 watermark.py postname添加水印,如果第一次运行要给所有文章添加水印,可以运行python3 watermark.py all。
404页面
- 进入 Hexo 所在文件夹,输入
hexo new page 404; - 打开刚新建的页面文件,默认在 Hexo 文件夹根目录下 /source/404/index.md;
- 在顶部插入一行,写上
permalink: /404,这表示指定该页固定链接为http://"主页"/404.html
---
title: 404
permalink: /404
date: 2016-09-27 11:31:01
---
---
## 页面未找到!
About/Resume页面
修改主题配置文件Mr-Framework/themes/3-hexo/source/config.yml
menu:
about:  # '关于' 按钮
 on: true # 是否显示
 url: /about  # 跳转链接
 type: 1 # 跳转类型 1:站内异步跳转 2:当前页面跳转 3:打开新的tab页

 # 在终端内运行
 hexo new page about  #在source目录下创建/source/about/index.md 编辑index.md即可
添加音乐插件
生成外链代码
在网易云音乐 搜索一个作为背景音乐的歌曲,并进入播放页面,点击 生成外链播放器
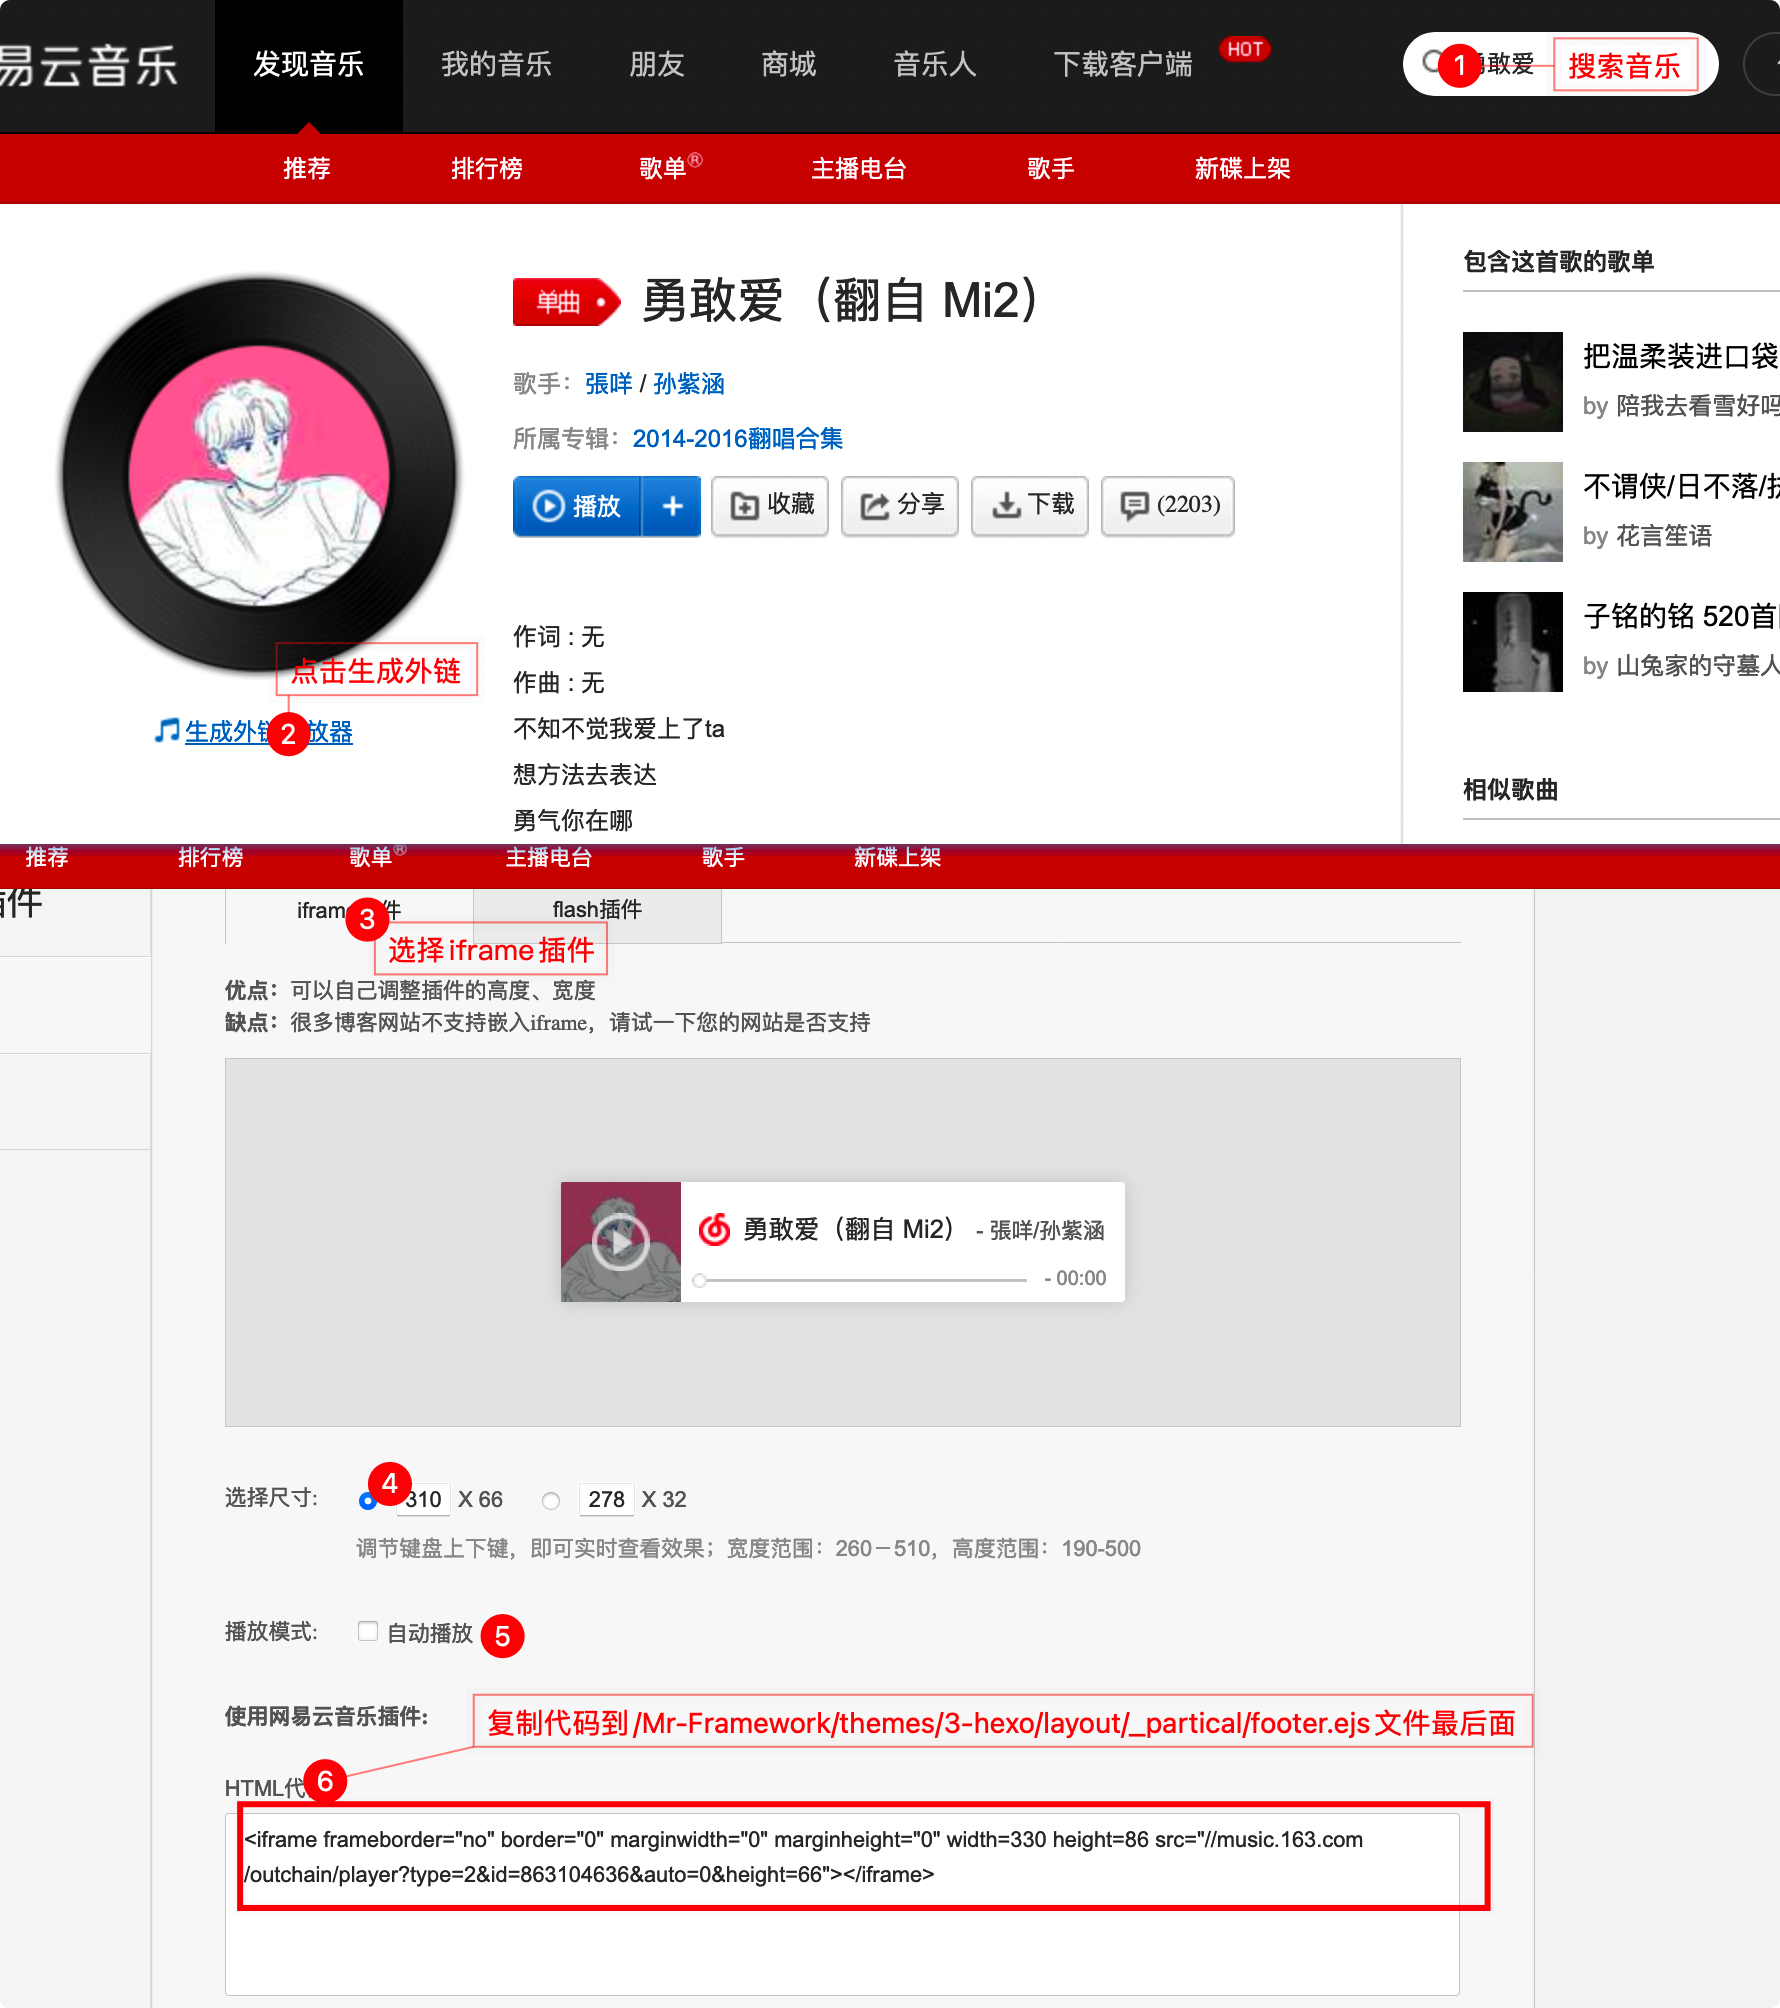
插入js脚本
给在第6步的外链代码进行优化如下,在**/Mr-Framework/themes/3-hexo/layout/_partial/footer.ejs**末尾添加下列代码
<div id="musicMouseDrag" style="position:fixed; z-index: 9999; bottom: 0; right: 0;">
                                                                                       <!--默认style是底部bottom,右下角right -->
    <div id="musicDragArea" style="position: absolute; top: 0; left: 0; width: 100%;height: 10px;cursor: move; z-index: 10;">
      </div>
      <!--网易云外链放在此处-->
  <iframe frameborder="no" border="0" marginwidth="0" marginheight="0" width=150 height=40 src="//music.163.com/outchain/player?type=2&id=1373296&auto=1&height=32">
   </iframe>
</div>


<!--以下代码是为了支持随时拖动音乐控件的位置,如没有需求,可去掉下面代码-->
<!--但是好像不能用 -->
<script>
var $DOC = $(document)
$('#musicMouseDrag').on('mousedown', function (e) {
// 阻止文本选中
$DOC.bind("selectstart", function () {
return false;
});
$('#musicDragArea').css('height', '100%');
var $moveTarget = $('#musicMouseDrag');
$moveTarget.css('border', '1px dashed grey')
var div_x = e.pageX - $moveTarget.offset().left;
var div_y = e.pageY - $moveTarget.offset().top;
$DOC.on('mousemove', function (e) {
var targetX = e.pageX - div_x;
var targetY = e.pageY - div_y;
targetX = targetX < 0 ? 0 : (targetX + $moveTarget.outerWidth() >= window.innerWidth) ? window.innerWidth - $moveTarget.outerWidth() : targetX;
targetY = targetY < 0 ? 0 : (targetY + $moveTarget.outerHeight() >= window.innerHeight) ? window.innerHeight - $moveTarget.outerHeight() : targetY;
$moveTarget.css({'left': targetX + 'px', 'top': targetY + 'px', 'bottom': 'inherit', 'right': 'inherit'})
}).on('mouseup', function () {
$DOC.unbind("selectstart");
$DOC.off('mousemove')
$DOC.off('mouseup')
$moveTarget.css('border', 'none')
$('#musicDragArea').css('height', '10px');
})
})
</script>
给博文加密🔐-hexo-blog-encrypt-功能暂未配置正确
安装hexo-blog-encrypt插件
npm install hexo-blog-encrypt 网站根目录下的_config.yml文件配置,添加如下字段
# Security
encrypt: # hexo-blog-encrypt
  abstract: 有东西被加密了, 请输入密码查看.
  message: 您好, 这里需要密码.
  tags:
  - {name: tagName, password: 密码A}
  - {name: tagName, password: 密码B}
  template: <div id="hexo-blog-encrypt" data-wpm="{{hbeWrongPassMessage}}" data-whm="{{hbeWrongHashMessage}}"><div class="hbe-input-container"><input type="password" id="hbePass" placeholder="{{hbeMessage}}" /><label>{{hbeMessage}}</label><div class="bottom-line"></div></div><script id="hbeData" type="hbeData" data-hmacdigest="{{hbeHmacDigest}}">{{hbeEncryptedData}}</script></div>
  wrong_pass_message: 抱歉, 这个密码看着不太对, 请再试试.
  wrong_hash_message: 抱歉, 这个文章不能被校验, 不过您还是能看看解密后的内容.
   silent: true   # 禁用日志输出
博文front-matter配置
---
title: Hello World
tags:
- 作为日记加密
date: 2016-03-30 21:12:21
password: mikemessi
abstract: 有东西被加密了, 请输入密码查看.
message: 您好, 这里需要密码.
wrong_pass_message: 抱歉, 这个密码看着不太对, 请再试试.
wrong_hash_message: 抱歉, 这个文章不能被校验, 不过您还是能看看解密后的内容.
---
禁用tag加密🔐
---
title: Callback Test
date: 2019-12-21 11:54:07
tags:
    - A Tag should be encrypted
password: ""
---

Use a "" to diable tag encryption.
禁用标签tag加密配置
在md文章中front-matter中设置如下
---
title: Callback Test
date: 2019-12-21 11:54:07
tags:
    - A Tag should be encrypted
password: ""
---
Use a "" to diable tag encryption.
给博文加密🔐-hexo-encrypt-正常配置
安装hex-encrypt
npm install hexo-encrypt # 安装hexo-encrypt依赖包配置站点配置文件
Mr-Framework/_config.yml 新增如下字段
encrypt:
  password: 123456   # 默认密码
博文头部front-matter配置
---
encrypt: true
enc_pwd: 123

---
enc_pwd不写,则是默认配置文件里的123456密码
加密界面微调
/***
Mr-Framework/node_modules/hexo-encrypt/lib/conf_post.js
***/
if (this.template == undefined || this.template == '') {
this.template = ' <input id="enc_pwd_input" type="password" style="' +
'border-radius: 5px;' +
'background-color: white;' + /* 密码输入框背景颜色 浅绿色 #E8FFE8 */
'border-style: groove;' +
'height: 30px;' +
'width: 50%;' +
'cursor: auto;' +
'font-size: 102%;' +
'color: currentColor;' + /* 密文字体*的颜色 默认为currentColor */
'outline: none;' +
'text-overflow: initial;' +
'padding-left: 5px;" onkeydown="if (event.keyCode == 13) { decrypt(); return false;}"> ' +
'<input type="submit" value="解 密" onclick="decrypt()" style="' +
'width: 58px;' +
'height: 34px;' +
'border-radius: 5px;' +
'background-color: #32414e;' + /* 提交按钮背景颜色 */
'border-style: solid;' +
'color: white;' + /* 字体的颜色 默认为currentColor */
'">' +
'<div id="enc_error" style="' +
'display: inline-block;' +
'color: #d84527;' +
'margin-left: 10px' +
'"></div>\n' +
'<script>\n' +
'var onError = function(error) {\n' +
' document.getElementById("enc_error").innerHTML = "password error!"\n' +
'};\n' +
'function decrypt() {\n' +
'var passwd = document.getElementById("enc_pwd_input").value;\n' +
'console.log(passwd);\n' +
'doDecrypt(passwd, onError);\n' +
'}\n' +
'</script>\n';
}手动添加js代码实现博文加密加密
/* 在Mr-Framework/themes/3-hexo/layout/_partial/header.ejs末尾添加如下js脚本  */
#JavaScript
<script>
    (function(){
        if('{{ page.password }}'){
            if (prompt('请输入密码') !== '{{ page.password }}'){
                alert('密码错误');
                history.back();
            }
        }
    })();
</script>
评论系统gitalk配置
注册OAuth Application
点击此处 来注册一个新的 OAuth Application。

修改主题配置文件
/Mr-Framework/themes/3-hexo/_config.yml
##########评论设置#############
comment:
  on: true
  type: gitalk  # 评论系统:gitalk、disqus、gitment、utteranc、livere,注意:使用时,在下方对应位置进行配置
  comment_count: true  # 文章标题下方显示评论数 目前仅支持 gitalk 和 disqus
  ## 使用说明 https://yelog.org//2020/05/23/3-hexo-comment/
# 各评论系统配置 ↓↓


gitalk:
  githubID: askDing    # githubID: github用户名
  repo: askDing.github.io  # repo: 使用哪个仓库的issue
  ClientID:  3675559917bdc294608c  #  创建 OAuth application 就会生成:
  ClientSecret: a826e0ded6d8b29a5bb77843f4c3805ecf7b263f   #  创建 OAuth application 就会生成
  adminUser: askDing # 使用自己的 github 用户名即可
  distractionFreeMode: true    # 全屏遮罩效果
  language: zh-CN   # 支持:en / zh-CN / zh-TW 三种
  perPage: 10   # 每次加载的数据大小,默认10,最大100
npm install gitalk # 安装gitalk模块更多评论配置请查看叶落阁
部署
Github部署
配置deploy
# Deployment
## Docs: https://hexo.io/docs/one-command-deployment
deploy:
  type: 'git'
  repository: https://github.com/askDing/askDing.github.io.git
  branch: master
npm install hexo-deployer-git. # 安装git部署插件
hexo d # 部署到github备份博客
cd Mr-Framework && git init   #进入博客目录并初始化git
git remote add origin https://github.com/askDing/Mr.Framework.git  # 添加远程git仓库
git add . && git commit -m "My Blog Backup"   # 初次提交到本地暂缓区
git push --set-upstream origin master  # 设置上游分支
git push origin master  # 上传到Github
hexo clean && hexo g && hexo d && git add . && git commit -m " `date` " && git push -f  # 部署到Github并进行备份
快捷命令
在.zshrc中添加
alias hs='cd ~/Mr-Framework && hexo clean && hexo g && hexo s'    # 启动本地服务
alias hdb='cd ~/Mr-Framework && hexo clean && hexo g && hexo d && git add . && git commit -m " Mr.Framework updated: `date` " && git push -f'    # 部署到Github并进行备份
Coding部署-1
5. 开启coding pages服务,绑定域名
如图:
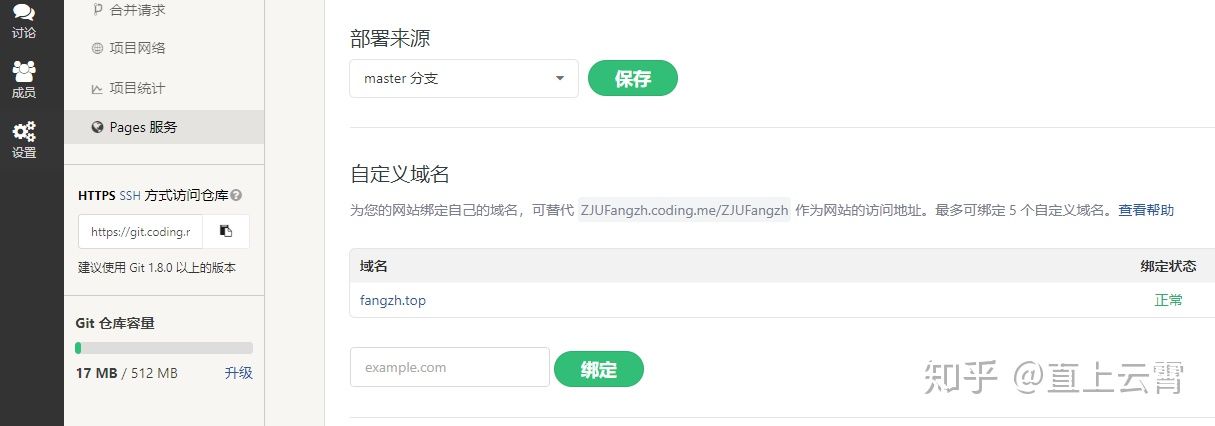
6. 阿里云添加解析
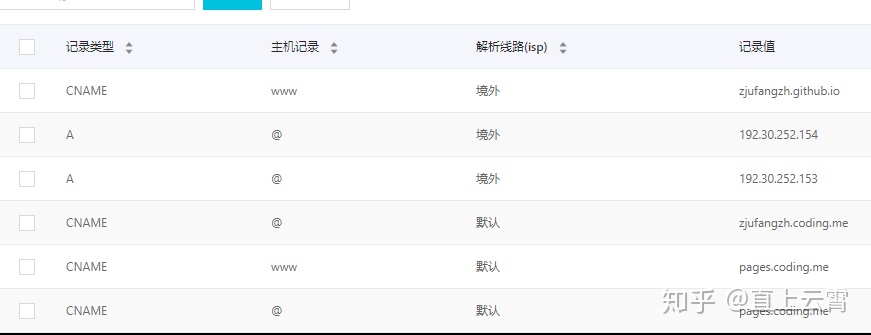
这个时候就可以把之前github的解析改成境外,把coding的解析设为默认了。
7. 去除coding page的跳转广告
coding page的一个比较恶心人的地方就是,你只是银牌会员的话,访问会先跳转到一个广告,再到你自己的域名。那么它也给出了消除的办法。右上角切换到coding的旧版界面,默认新版是不行的。然后再来到pages服务这里。
这里:
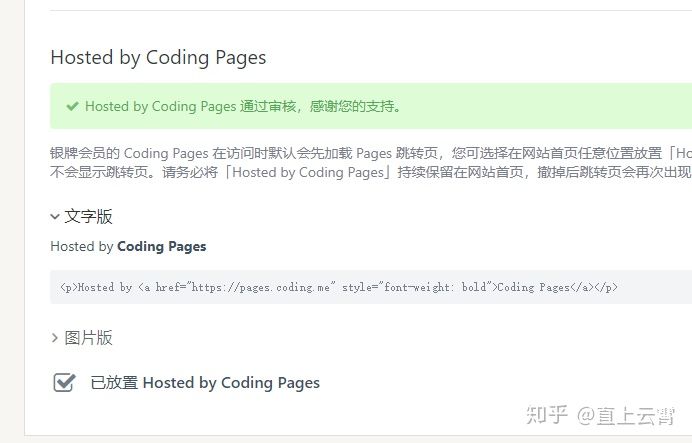
只要你在页面上添加一行文字,写Hosted by Coding Pages,然后点下面的小勾勾,两个工作日内它就会审核通过了。
<p>Hosted by <a href="https://pages.coding.me" style="font-weight: bold">Coding Pages</a></p>我的选择是把这一行代码放在主题文件夹/layout/common/footer.ejs里面,也就是本来在页面中看到的页脚部分。
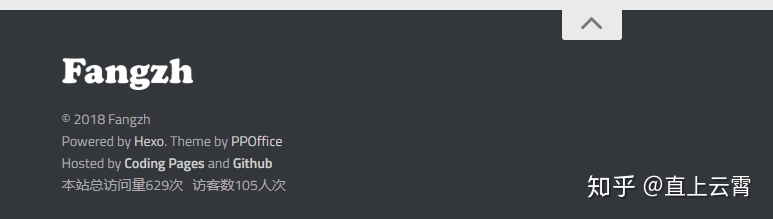
当然,为了统一,我又在后面加上了and Github哈哈,可以不加。
<p><span>Hosted by <a href="https://pages.coding.me" style="font-weight: bold">Coding Pages</a></span> and <span><a href="https://github.com" style="font-weight: bold">Github</a></span></p>这是最终加上去的代码。
Markdown编辑器配置-Typora
Preferences
General
- On Lauch >open custom folder set source of the hexo blog folder
- Save & Recover > ☑️ Save without asking when switch files on side panel
Apperarance
- Font Size > ☑️ Auto
- Themes
- Open Theme Folder Downloaded from typora
Editor
- Indent Size on Save
- Auto ☑️ Pretty indentation
- Auto Pair
- ☑️ Auto pair brackets and quotes
- ☑️ Auto pair common Markdown syntax
- Default Copy Behavior
- ☑️ Copy Markdown source as plain text
- Indent Size on Save
Image
- When Insert ...
- Copy image to custom folder
- ../imges
- ☑️ Apply above rules to local images
- ☑️ Apply above rules to online images
- ☑️ User relative path if possible
- ☑️Auto escape image URL when insert
- When Insert ...
转载请注明来源,欢迎对文章中的引用来源进行考证,欢迎指出任何有错误或不够清晰的表达。可以在下面评论区评论,也可以邮件至 askding@qq.com

